Borscht and Rye
1/4/2024 | 26m 56sVideo has Closed Captions
Dan makes Hot Ukrainian Borscht, Erin makes Deli Rye Bread; review of bread lames
Test cook Dan Souza makes host Julia Collin Davison Hot Ukrainian Borscht. Equipment expert Adam Reid shares our recommended bread lames. Test cook Erin McMurrer bakes host Bridget Lancaster her favorite Deli Rye Bread.
Problems playing video? | Closed Captioning Feedback
Problems playing video? | Closed Captioning Feedback
America's Test Kitchen is presented by your local public television station.
Distributed nationally by American Public Television
Borscht and Rye
1/4/2024 | 26m 56sVideo has Closed Captions
Test cook Dan Souza makes host Julia Collin Davison Hot Ukrainian Borscht. Equipment expert Adam Reid shares our recommended bread lames. Test cook Erin McMurrer bakes host Bridget Lancaster her favorite Deli Rye Bread.
Problems playing video? | Closed Captioning Feedback
How to Watch America's Test Kitchen
America's Test Kitchen is available to stream on pbs.org and the free PBS App, available on iPhone, Apple TV, Android TV, Android smartphones, Amazon Fire TV, Amazon Fire Tablet, Roku, Samsung Smart TV, and Vizio.
Providing Support for PBS.org
Learn Moreabout PBS online sponsorship♪♪ ♪♪ ♪♪ ♪♪ -Today on "America's Test Kitchen," Dan makes Julia hot Ukrainian borscht, Adam reviews bread lames, and Erin makes Bridget deli rye bread.
It's all coming up right here on "America's Test Kitchen."
-"America's Test Kitchen" is brought to you by the following.
-Plugrà European-style butter was created for all chefs, cooks, and bakers.
Slow-churned with 82% butterfat for a smooth texture and more pliability for flaky crusts.
Plugrà -- from professional kitchens to your home.
-Sur La Table, where you can discover an assortment of provisions for your next meal or gathering, from cookware and tools from a wide variety of kitchen brands, to hands-on cooking classes.
Visit us at surlatable.com.
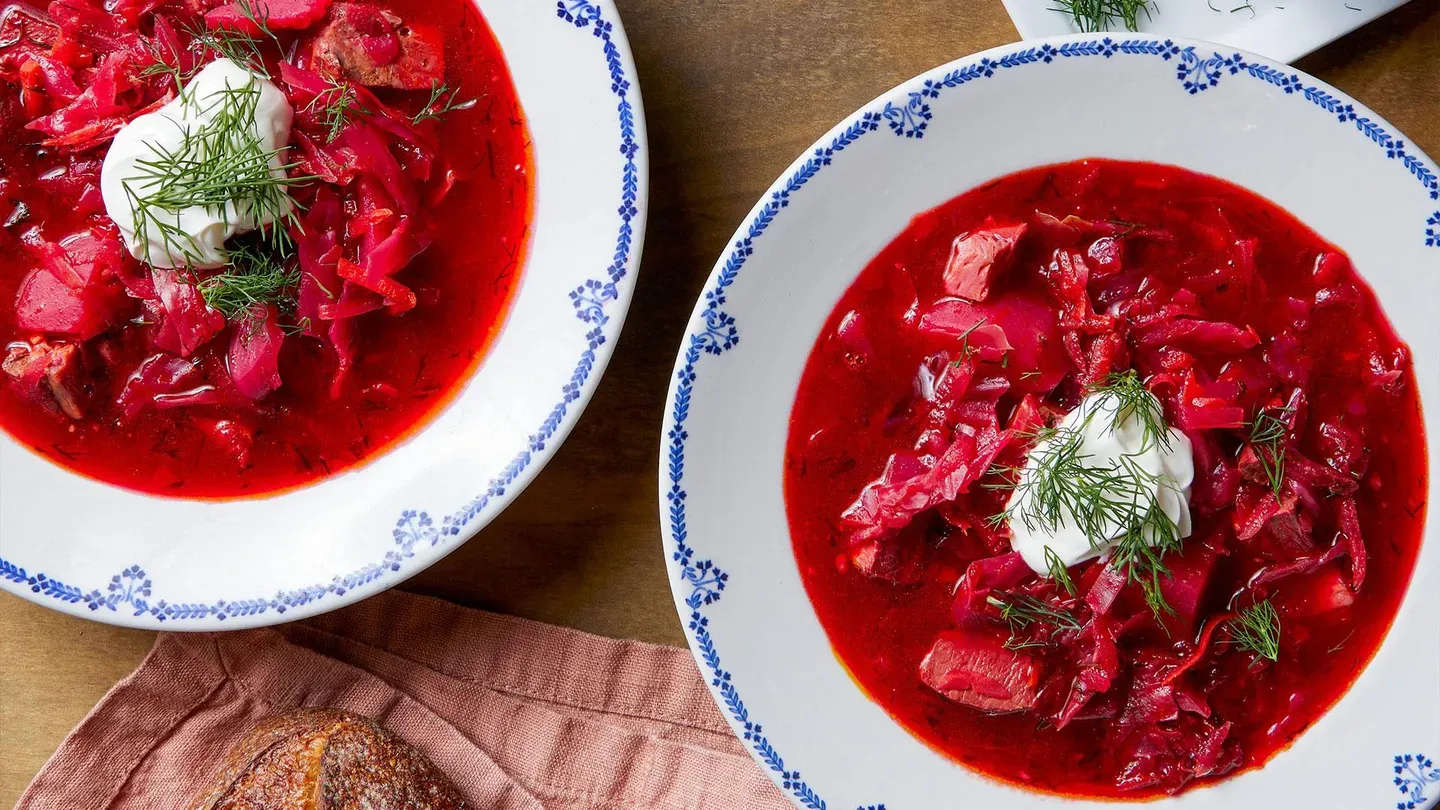
♪♪ -Borscht is an important part of Ukrainian culture, and cooks always argue about what should go in it, how it should be made, and whether it should be served hot or cold.
But today Dan's gonna make us a hot version that has a good meaty backbone made with pork.
-That's right.
Borscht is often characterized by the vegetables that go into it, and we'll definitely get there, but we're actually gonna make one based on pork.
-Mmm.
-First we're gonna start with a few aromatics.
So I've got one large carrot here.
And we're just gonna cut this into one-inch pieces.
It doesn't have to be pretty.
It doesn't have to be perfect.
An onion.
For this here, we're just gonna cut it in half.
-Okay.
-Okay, great.
So I've got 10 cups of water in a Dutch oven over here.
We're gonna add our onion halves and our carrot.
And now time for our pork.
So this is two pounds of pork shoulder, also known as pork butt.
A lot of times they have a big fat cap on them.
If you leave that on it's not a big deal, but it's gonna render out in here, and then you're gonna have more fat to skim.
So I'm just gonna cut this in half right down the center and pop it in.
-That's it?
-That's it.
So this is gonna flavor the broth.
We're also gonna use the meat in the soup itself.
And then we have a 1/2 teaspoon of table salt and then two bay leaves.
-Mm-hmm.
-Don't skip those.
Okay, so I'm gonna bring this up to a boil over high heat.
And then once we get there, we'll drop it down to a simmer, cover, and we're gonna cook it for two hours.
And it'll be very tender but still holding together.
How does it smell in here?
-Smells good.
-Right?
So it's been two hours.
We're gonna take a look at our stock here.
-Look at the color.
-Looks gorgeous.
-Yeah.
-So what we're gonna do is take out our pork now.
I'm gonna transfer this over to the cutting board.
So I'm just gonna use a wire skimmer here to get rid of our onion, carrot, and bay.
I'm also gonna use my ladle here to skim a little bit of fat.
I'm just gonna kind of scoot around and see if I can pick up any big bits.
All right.
So let's pop over to the pork here.
We're gonna cut this into bite-size pieces.
-Okay.
-So they'll be really nice little morsels in the soup.
Kind of rough pieces like this.
-Mmm.
-All right.
We have entered veggie land.
First I'm gonna start by taking a 1/2 cup of broth here.
And we're gonna reserve this for deglazing.
Our broth is at a boil, so we're gonna start adding some potatoes.
This is a pound of Yukon Golds that are cut into one-inch pieces.
We have half of a small head of green cabbage that we've cored, sliced in half, and then shredded.
And another 1/2 teaspoon of salt.
So I'm gonna cover this up, trap all that nice steam.
We'll drop it down to a simmer and we'll cook for about 8 to 10 minutes until those potatoes are nice and tender.
-All right.
-All right.
Now it is time to turn our attention to what most people think of as the star of borscht, which is beets.
So I'm gonna put on some gloves.
-Yes.
-All right.
We're gonna work with 8 ounces of beets total.
So I'm just gonna take the top off and that stem there.
I'm gonna trim the ends.
And then I'm gonna use my peeler here to just go around and take off that skin.
All right.
And then we're gonna use our box grater.
It's a really nice way to break it down into small pieces without using your knife for a ton of work there.
So while we're simmering some of our vegetables -- we have the potatoes and cabbage in there -- we're actually gonna sauté some of the other ones.
We're gonna start with onions.
So I've got 1/4 cup of vegetable oil in the pan here, which is a fair amount.
I have one onion that has been minced up.
We're gonna cook this until it's softened, which takes about five minutes.
All right.
Let's get our carrots in there.
So this is two carrots that we shredded on that box grater.
And then we've got our 8 ounces of beets that we also grated.
Okay, and another 1/2 teaspoon of salt.
-Ooh, that's a pretty skillet.
-Isn't it?
Now you can already see the beets bleeding, right, and some of the oil picking up that color.
We're gonna cook this for about three to five minutes, which is not that long when you're talking about beets.
And they'll soften and really take on a nice flavor.
So in a magic act that you just saw here, I've turned everything in the skillet into beets.
You thought there were onions and carrots.
It's all beets.
-It's beautiful, though.
-Isn't it gorgeous?
-Mm-hmm.
Ruby red.
-Beautiful.
Okay, so now our next step is to add a 6-ounce can of tomato paste.
Acidity is really important in borscht.
So you get it from lemon juice, you get it from tomato paste, sometimes kvass.
And so we're gonna cook this until it gets a little bit of nice color and starts to stick to the pan a little bit.
That'll take one to two minutes.
You can see a little bit of fond forming there.
-Oh, yeah.
-So we're gonna use our reserved 1/2 cup of broth.
-Aha!
-We're gonna slowly add it and use it to scrape it up.
It's been about 10 minutes on the potatoes.
-Mm-hmm.
-And I can tell with my knife that it's really nice and tender.
So we're gonna scrape all of this gorgeous mixture right in.
So we're gonna simmer this for about five minutes.
We've done most of our cooking, so this is just about melding the flavors together.
And we're very close to serving time.
Let's see what's happening in here.
-Oh, that smells delicious.
-Doesn't it smell so good?
-Yeah.
I love the color.
-That color.
We're gonna add our pork back.
-Mm.
-Fully cooked and nice and tender.
So we'll just be warming this through.
Really key flavor here is dill.
So we have 1/3 cup of fresh chopped dill.
-I was gonna say, that's not a small amount.
-Not a small amount.
And we're gonna have some more later too.
And then I've got a tablespoon of lemon juice.
And then finally a 1/2 teaspoon of salt.
Stir this in.
Oh, man, that dill immediately gets so aromatic when it hits the broth.
-That looks gorgeous.
Oh, look at the potatoes.
They're rose-colored.
-Right?
-Oh, that's beautiful.
-It is time to serve.
-Oh, look how hearty that is.
That is chockablock full of vegetables.
-So the final touches.
We've got some sour cream and some dill.
-Mm-hmm!
-The contrast of colors is so nice.
-I love it.
-I'm so excited for you to try this.
-It is so aromatic.
I'm gonna try just the broth first, be a purist.
Oh, wow.
You get the beets and you get the sweetness.
You get the tomato.
It has that pork backbone, but it's by no means overpowering.
And then the fresh dill.
-Isn't it that interesting balance of it's hearty but also refreshing?
-Yeah.
-It's like, when have you ever said that about a soup?
I love getting a little bit of the sour cream mixed in there, add a little bit more richness to it.
-Dan, this is incredible.
Thank you.
-You're welcome.
-If you want to make a hot, porky Ukrainian borscht, start by simmering a boneless pork butt roast in water to make broth.
Peel, shred, and then sauté the beets before adding them to the soup.
Stir in the cooked pork and a handful of fresh dill just before serving.
From "America's Test Kitchen," a terrific recipe for hot Ukrainian borscht.
This is fantastic.
-It's so good.
♪♪ -Most bread recipes include a step -- Right before baking, you take the dough and you make a couple of slashes or scores on the top of the bread.
Now, you can use a very sharp knife to do this, but why not use the right tool for the job?
And that tool is a baker's lame.
And Adam's here.
He's gonna tell us more.
-Exactly as you said.
You can get away with a paring knife.
You can get away with a utility knife if you want.
But the right tool is a baker's lame.
Let's back up for a second.
The reason you do this is because when bread bakes, the moisture in the dough will migrate towards the surface of the loaf, and it will find a weak spot and it will escape from the loaf.
And that can cause weird ruptures.
It can cause misshapen loaves.
-Right.
-If you make those slashes, scoring it, you control the weak spot where the moisture escapes.
-Engineering the vents.
-Yeah, your engineering the vents.
Exactly.
That's the perfect way to put it.
And this loaf shows that.
There were a couple of scores.
And so it was predictable how the bread was gonna expand.
-Right.
-Another reason to do it is to put ears in a loaf.
That's very typical in a baguette.
That's the little flap that sticks up.
And that's the mark of a well-made baguette.
-It's the best part.
-Oh, so crispy, so yummy.
-Mm-hmm.
-Or decorative.
-That's stunning.
-Look at that.
Lines, patterns.
It's such a beautiful, polished, professional look.
They're great.
-You'd expect to buy that, but you can actually do that at home.
-You can do that at home if you have the right lame.
And that's what we're gonna talk about.
-Excellent.
"Lame" is French for "blade."
We tested seven bread lames.
They were priced between $7 and a little over $29.
And testers used them to score 10 loaves of pain au levain and eight baguettes.
And in the baguettes in particular, they put in those slashes that will make the ears.
-Of course.
-These are basically razor blades with handles.
They're really sharp.
So you want to be able to handle them as little as possible when you are loading the blade onto the handle.
Some of them felt a little finicky.
You had to tinker a little too much.
That felt kind of risky to some of the testers.
This one just has a simple screw.
You unscrew it like so.
The blade comes off.
Put the blade on, stabilize it with your thumb, screw it back on.
Very simple, very secure.
Another reason that testers liked these is because you have both sides of the blade exposed.
And that's good because not only are some bakers righties and some lefties and it makes that easier, but if you're scoring with a top corner and you've done it a bunch and the corner gets kind of dull or gunked up, then the second one is already exposed.
You can just flip it over and score with the other corner without having to reorient the blade.
The handles are obviously very important when you're dealing with such a sharp blade.
Testers preferred handles, again, like this one.
This is a pretty simple shape, and it just let them get comfortable in lots of different hand positions, as opposed to something like this one, which has this odd-looking little sort of baguette thing.
-Right.
-But that limited the hand positions.
And one example of this is that, for cutting the ears, a lot of bakers recommend holding the lame at the back, whereas for a lot of control for intricate patterns, some bakers want to choke up on that to control the blade more.
And the handle has to allow for both types of grips.
One that had a completely different kind of handle is this guy here.
-That's adorable.
-This one's round.
This took some getting used to for the testers because it's such a different design, but once they got used to it, they found that actually holding it this way gave them a lot of control.
Another question the testers considered is whether you want to have the blade straight or configured with a little bit of a curve to it.
-Okay.
-A lot of bakers really swear by a little curvature for getting great, distinct-looking ears on their loaves, and most lames will allow for one or the other configuration.
-Right.
-However, I have two examples of the same lame here.
And you can see one of the blades is straight, the other one is curved, so some lames will let you do it either way.
-Nice.
-That's a big benefit.
-Very versatile.
-And in fact this is the winning lame.
This is the Baker of Seville artisan bread lame.
It's about $16.
This is the one that's adjustable so you can have a curved or a straight blade in the same lame.
It's got a great handle.
It was easy to install the blade.
And it comes with its own case so you can store it really safely.
-Very nice.
-And then there was a second one.
There's one that testers chose as the best for intricate scoring, and that was this guy here.
This is the wire monkey UFO Bread Journey lame.
It's about $28.
And this is the one that took a little bit of getting used to.
But once you're used to it, testers really understood why it's such a favorite, 'cause it gives you great control over the blade.
-So if you want to pick up a baker's lame if you're baking lots of bread at home, then the winner is the Baker of Seville artisan bread lame, and it runs about 16 bucks.
♪♪ Oh, it's a great day in the test kitchen because we're baking bread.
My favorite thing.
And we're gonna make great rye bread.
We need some rye flour.
Now, I've got a couple examples here.
This is pumpernickel flour.
Now, pumpernickel flour is just simply the whole rye kernel.
It is unsifted.
Now, it contains the whole germ, the whole bran.
It's just milled down.
This is great, obviously, for pumpernickel bread.
It gives that distinct dark color and robust flavor.
But we're making rye bread, so we're gonna need rye flour specifically.
And when you look for rye flour at the market it comes in all different types of colors.
There's light, medium, and dark.
This is light rye flour here.
And you can see it's lighter in color, and you don't see a lot of those flecks.
It's been sifted.
A lot of the bran is out there, but it still has that nice rye taste.
Well, let's see what type of rye flour we're gonna use because Erin's here, and she's making -- I cannot wait.
Rye bread is one of my very favorite things.
-Bridget, I love rye bread.
And there's a ton of different styles out there.
We are gonna make an American-style lighter loaf.
The types of flours in a bread largely determines the texture.
And so we want a sandwich bread.
And using all rye flour gave us a very dense loaf.
So we found we needed to use two different types of flour.
So we're gonna use medium rye flour, and we're also gonna use all-purpose flour.
So the important thing is that rye flour does not contain the protein that creates gluten.
That's why we're adding all-purpose flour.
-A little wheat flour.
-A little wheat flour.
Exactly.
-Gotcha.
-We found that King Arthur flour that has 11.7% protein gave us the chew that we wanted.
Okay, so we're gonna go with 8 1/4 ounces of rye flour.
-Okay.
-Medium or dark is fine.
-Okay, great.
You can use either.
-Yes.
I have medium here.
And we're gonna go with 12 1/2 ounces of King Arthur all-purpose flour.
The perfect ratio that we found was 60% wheat flour to 40% rye flour.
It gave us the rye flavor that we wanted, but the wheat flour gave us the structure that we needed.
-Nice.
For a sandwich loaf.
-Exactly.
Rye bread is known for its caraway flavor.
So we're gonna add a tablespoon of the caraway seeds.
I have 2 1/2 teaspoons of instant-rise or rapid-rise yeast.
So I'm just gonna whisk these together to combine.
Okay, so let's move on to our liquid ingredients.
So adding too much water can actually dilute the gluten.
But another thing about rye flour is that rye flour contains a carbohydrate called arabinoxylan.
And arabinoxylan gives the rye flour the ability to actually absorb four times the amount of water than wheat flour does.
So you'd think that that would be a good thing, but it's not because it all gets trapped in the flour.
So there's no free water.
-Right.
So it feels dry.
There's tons of water in there, but it feels dry.
-Exactly.
And eats dry.
So we found that using 1 2/3 cup of room-temperature water was like the perfect amount of water.
So we're gonna add 1 tablespoon of vegetable oil.
This is just gonna add a little richness to our dough.
And we're gonna add 2 teaspoons of molasses.
And you don't want to use blackstrap molasses.
It's a little too bold.
So we just want to whisk this together.
Now we're just gonna make our dough.
So I'm gonna add our liquid ingredients to our dry ingredients.
We're just gonna mix this on low until a dough comes together, about two to three minutes.
All right, I'm just gonna scrape the bowl just to make sure we get all the dry ingredients incorporated.
-Yeah, there's always pockets of dry flour at the bottom of the bowl.
-Yeah.
We want all that flour to be incorporated so it gets hydrated.
This is what we're looking for.
We're just gonna let this sit here for 20 minutes.
And this stage is very important.
This is called autolyse.
So this is where the flour is gonna hydrate and glutens are gonna start to form, which is gonna give our bread more structure.
I'm just gonna cover this so it stays moist.
All right, Bridget, it's been about 20 minutes, and you can't really see a difference, but there is a difference.
So now we are just going to add our salt.
So I'm gonna add 1 1/2 teaspoons of table salt.
And we're gonna mix it on medium low for five minutes until an elastic ball takes shape and it clears the sides of the bowl.
All right, Bridget.
It's clearing the sides of our bowl, and I can see the elasticity being formed.
So now I'm just gonna lightly flour my counter.
And I'm gonna knead this for about 30 seconds... -Gotcha.
-...to kind of bring it together into a ball.
Okay, so now we're just gonna put this into a lightly oiled bowl, seam side down.
And we're gonna cover this with plastic wrap.
We're gonna let this rise until it's doubled in size, about one and a half to two hours.
What do you think?
-Voluminous.
-Voluminous.
Yes.
I would say that this is definitely doubled in size.
-Definitely.
-It's been about close to two hours.
-Okay.
-All right.
So I'm gonna lightly flour my counter.
So now I'm gonna press this into an eight-inch disk.
And this is basically what we call a preshaping stage.
I'm pressing it to degas it.
It's about eight inches.
And now I'm just gonna pull the edges into the center and shape it into a ball.
So we're just gonna let this sit.
I'm gonna cover it again.
We want the gluten to rest so that it will be easy for me to shape in a little bit.
All right, Bridget, it has been 15 minutes and our dough has rested, so let's proceed with shaping this.
I'm gonna now press this into a 9-by-12-inch oval.
-All right.
-All right.
So first step, you want the short side towards you, towards the edge of the counter.
9 by 12.
So, first we're gonna fold in the corners.
This is one, two.
I'm just pressing.
And now I'm gonna take this tip.
And I'm gonna bring it to the center of the oval.
And then I'm gonna press again.
So now I'm gonna do the same thing with the other side.
Okay, so I just turned it 180 degrees.
Fold, fold, and then bring the point into the center.
-Gotcha.
-And now I'm just gonna fold this in half.
So it's roughly about 8 by 4.
I'm gonna use the heel or the side of my hand to kind of press that seam together.
And I'm gonna roll it seam side down.
And I'm just gonna kind of shape it.
And it's like a torpedo, right?
-Yes.
-And now I'm just gonna tuck under the ends and just kind of press to seal.
And now it's a nice uniform loaf.
-Lovely.
Lovely.
-Yeah.
-So I'm gonna transfer this over to a piece of parchment paper that I have on a pizza peel.
I'm gonna lightly flour this with a little bit of rye flour.
And transfer this gently into the center of this.
And if you don't have a pizza peel, you can just use a flipped-over, upside-down rimmed baking sheet.
-Fantastic.
-All right.
I'm gonna grab this piece of plastic wrap, lightly spray it with oil.
Okay, so we're gonna let this sit here for about 45 minutes to an hour and a quarter until the size increases by about 50%.
Okay, Bridget, our dough has risen that extra 50%.
-That looks fantastic.
-Isn't that beautiful?
So I'm gonna show you how to tell that it's ready.
-Okay.
-So we call it the knuckle test.
Where basically you just put your knuckle, and it should slowly spring back.
We want our loaf to expand and rise.
What's gonna help it is by adding some slashes.
So I have a lame, and I'm just gonna make a few slashes that are about four inches long, about a half inch deep, every inch or so.
-Gotcha.
-When it goes into the oven, it's gonna allow it to actually expand even more.
-Little slices in it, little slashes in it for expansion cuts.
-Exactly.
If you don't have a lame, then you can use a sharp paring knife.
-Perfect.
-So over here I have boiling water.
And I'm just gonna measure out 2 cups of the boiling water.
We're gonna create a steam oven.
And what that steam is gonna do is it's gonna keep the dough softer for even longer, which is gonna allow it to rise even more, which is gonna give us more spring.
-Gotcha, so steam prevents the crust from setting up before it bakes.
-Exactly.
Yep.
-Gotcha.
A bigger loaf.
-A bigger loaf.
-That's what we want.
-All right, can you carry the water over to the oven for me?
-Yep.
-Great.
Okay, so, Bridget, as you can see here, we're gonna work quickly.
I have a baking steel that's been preheating at 450 for about an hour, and also a loaf pan.
So I'm gonna slide my loaf right onto the baking steel.
And then if you can pour the water right into that pan -- be careful.
It's gonna have a big burst of steam.
-Nice.
-Excellent.
So this is how we're creating a steam oven.
It takes about 25 to 30 minutes and we're gonna rotate it halfway through.
-Oh, that smells so good.
-Beautiful.
All right.
Oh, doesn't that look beautiful?
-That is gorgeous.
-Okay, so the best way to know that it's ready is to take the temperature.
All right, I'm just gonna go right into the center.
So we're looking for 205 to 210 degrees.
-Okay.
-207.
So there's one more step, Bridget.
This is a very hearty crust.
It's great for rustic bread, but for sandwich bread we want it a little softer.
-Gotcha.
-So what we're gonna do is we're actually gonna make a cornstarch slurry.
-Hmm, okay.
-So we have 4 teaspoons of cornstarch and a 1/2 cup of water.
So I'm basically just gonna whisk this together.
And I'm gonna microwave it.
It's gonna thicken up.
And then I'm gonna brush it over the top of the loaf.
It's gonna do two things -- It's gonna give our loaf a little bit of shine.
Also the moisture in it is going to soften the crust a little bit.
Okay, so all I'm gonna do is microwave this for about one to two minutes, and I'm gonna whisk it every 15 seconds or so until it's nice and thick.
Perfect.
-It's like a gel.
I love that.
-So I'm basically just gonna brush this all over the loaf.
And it's important that both are hot.
And there's a lot here.
You're not gonna use it all.
You're gonna use about 3 tablespoons worth of the mixture.
So we're gonna let this cool for about three hours, and the crust is gonna have time to soften.
-All right.
-I have waited.
-You have waited.
You've been so patient.
It's been about three hours, and our loaf is cooled.
-Definitely cooled enough for me to eat.
-Yes.
Mission accomplished.
-Mm!
Mm.
-Ohh.
Smell that caraway too.
It's like the first thing I do is smell the aroma of bread, freshly baked bread.
-Yes.
-Would you like one slice?
-At least?
-At least.
So, would you like some softened butter?
-Yes.
A little flaked sea salt.
-Yeah.
It's almost too pretty to eat, right?
-Not even close.
[ Chuckles ] Mmm.
-Mmm!
-Lovely and soft on the inside.
There's definitely still some heartiness to the crust but it's not super, super tough.
Mmm!
-The caraway seeds just really make this rye for me.
-Mmm.
What is it about rye bread?
It has such a distinct flavor.
Nothing else compares to it.
This was, bar none, an A1 loaf of rye bread.
Spectacular.
Thank you so much, Erin.
-Thank you, Bridget.
That was fun.
-It was fun for me too.
And it will definitely be fun for you as well to make this hearty homemade rye.
It starts with using a mix of rye and all-purpose flour.
Create a makeshift steam oven by pouring boiling water into a loaf pan and brush a cornstarch mixture onto the baked loaf for a shiny, soft crust.
So from "America's Test Kitchen," a fabulous recipe for deli rye bread.
You can get this recipe and all the recipes from the season along with product reviews and select episodes.
And those are all on our website, americastestkitchen.com/tv.
Still no corned beef?
Okay.
Whatever.
-Visit our website where you can sign up for our free e-mail newsletter for even more of the recipes and stories you love from all of our cast and cooks -- americastestkitchen.com/tv.
-From the cooks and editors of "America's Test Kitchen," "Cook's Illustrated" magazine has been all about the why and how of cooking for over 30 years.
Get a year of award-winning reporting, science-based discoveries, trusted reviews, and more.
The cost is $19.95.
That's 63% less than the cover price.
To subscribe, scan the QR code on your screen, or visit cooksillustrated.com/ tvsubscribe.
"America's Test Kitchen" is brought to you by the following.
-Plugrà European-style butter was created for all chefs, cooks, and bakers.
Slow-churned with 82% butterfat for a smooth texture and more pliability for flaky crusts.
Plugrà -- from professional kitchens to your home.
-Sur La Table, where you can discover an assortment of provisions for your next meal or gathering, from cookware and tools from a wide variety of kitchen brands, to hands-on cooking classes.
Visit us at surlatable.com.
♪♪ ♪♪ ♪♪ ♪♪ ♪♪ ♪♪


Support for PBS provided by:
America's Test Kitchen is presented by your local public television station.
Distributed nationally by American Public Television